One afternoon I saw that there were some
board games on a bookshelf. So, my dad
and I went exploring. Then, my dad found
a Chess set. He asked me if I wanted to
learn how to play Chess. I said, “Yes!” After lunch, we played at the picnic table on
the back porch so we could also enjoy the amazing view. It didn’t long until I was hooked on the
game.
Two weeks later, school was starting! I was super excited! I was going into Grade 5! My new teacher’s name is Mr. Chapman. It didn’t take long to learn that Mr. Chapman
likes to play Chess, too! On Fridays, if
we are finished our school work early, we can play Chess at the end of the day
with one of our classmates.
About 2 months into the school year he started
the school chess club! I really liked
playing chess at the end of the day so I knew I would like chess club, too. So, I signed up! Now on Fridays, at first recess, in the
library, I play chess with other students in the school.
My love for chess grew even more when I
turned 10 on my birthday! I was very
happy when I opened up the present from my Oma and Opa to find a chess
set! Now my parents and I have such a
fun time playing chess together!
When I play my mom, sometimes I win and
sometimes she wins. When I play my dad,
he annihilates me! But he always says, “Don’t
be upset if you lose, because that’s how you get better at the game… learning from a more skilled player.”
Since the weather was
getting colder, we couldn’t go outside as much.
So, my dad and I needed to find something new to do. Then, my dad asked me if I would like to make
a painting for my teacher Mr. Chapman! I
said, “Yes!”
My dad has been teaching me about art for
a long time. Every year we make an artwork
for my teacher. Last year, it was my
first time painting on a full sized canvas!
It was very challenging, but I was up for the challenge. This time, He said that he was excited to
show me another fun technique. He calls
it The Wiggly Worm technique! I laughed
when he said this!
Now, we just needed to figure out what we
were going to paint. We always like to
paint the artwork based on the likes of my teacher. For example, last year my teacher really
liked soccer, so we painted a picture with a soccer ball in it! For this new painting it only took half a
second for both of us to think about painting an artwork about chess!
So, we went to Google
Translate and made it so we could translate English to Japanese. Then we typed in things like playing chess,
winning, and strategy. That’s when a
very interesting symbol that means ‘the winning strategy’ appeared on my
screen. There was a link underneath the
image, so we clicked on that to learn more about this symbol…
1. Do not harbor sinister design
2. Diligently pursue the path to adapt to your environment
3. Cultivate a wide range of interest
4. Be knowledgeable in a variety of occupations
5. Be discreet regarding one’s financial dealings
6. Nurture the ability to perceive the truth in all matters
7. Perceive that which cannot be seen with the eye
8. Do not be negligent, do not procrastinate
We thought that the symbol looked cool and
we also thought that the story behind it was pretty cool too! Then I thought that the symbol should be
included in the painting and my dad agreed!
The last thing we needed to do before we designed the painting was filling our minds with ideas on what we were going to paint. Then I thought back to what we did last time to figure out what to paint… we went on Google to search paintings of soccer! So we decided to do that this time too, except (obviously) we would be searching for images about chess!
While I was searching my dad thought we
should listen to music! Then he thought
about a band that he listened to over 30 years ago called ‘Big Head Todd and the
Monsters’ and their record called ‘Strategem’! He had me find the definition
for this word and I showed him that it is actually spelled ‘stratagem’. My dad said that the band was probably trying
to be clever and spelled it with an ‘e’ for some sort of reason… he didn’t
know. The definition for stratagem is a plan or scheme, especially one used to outwit an
opponent or achieve an end. I thought
that this could be a great name for my painting. My dad agreed!
So… with some music playing, I went searching. These are some of the
images that I found while I was looking…
These were all really
cool paintings, but none of them inspired us.
Then my dad thought maybe we could set up a chess board in an
interesting way, and then take a picture of it.
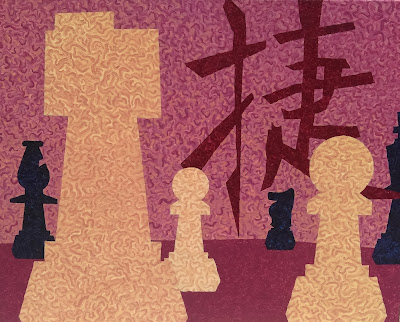
It took a couple tries until we found a setup we liked. It looked really cool because some pieces
were farther away from others so they looked smaller! We had the camera really close to the first
few chess pieces so they would look really big.
The next thing I had to do was trace the
images. Carefully, I taped a piece of
paper to the computer and traced the Japanese symbol. Then, on another piece of paper, I traced the
chess image.
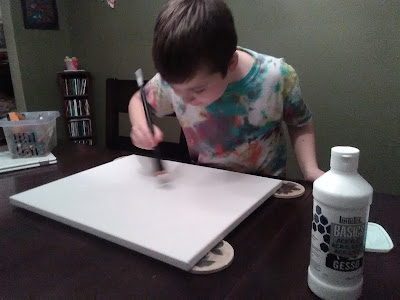
Now I just had to Gesso the canvas. Gesso is like
a white paint. You put on the Gesso first to smooth out the canvas.
Gesso is always the first step. You need to put on three layers of it.
We gave the Gesso a full day to dry. Then it was time to put the two images onto
the canvas. There were two ways we transferred
these images onto the canvas!
The first way was to use a grid. On the sheet of paper with the chess image on
it, I drew a grid. I also drew a grid on
the canvas. Because the canvas was
bigger than the piece of paper, the grid squares were also bigger. To use this method, all you have to do is
copy the lines inside each grid square (from the piece of paper) into the grid
squares on the canvas. This was rather tricky
because there was so much detail in the chess pieces.
The second way was to use my dad’s special
tracing paper. The paper has one side of
it covered in graphite. Graphite is the
same stuff they use to make pencils.
When you push down on the graphite paper, it leaves graphite on the
canvas. So, I got the sheet of paper
with the Japanese symbol on it, and put it on top of the graphite paper, with
the graphite side facing down on the canvas.
Then, I simply traced over the Japanese symbol.
There!
Both images were now on the canvas.
I was ready to start painting!!!
To get started, we had to mix our first colour. We decided the painting should be mostly red… very similar to a monochromatic colour scheme. Monochromatic means that only one (mono) colour (chrome) is going to be used… but there can be many different shades of that one colour. Some shades could be darker. Some shades could be lighter. Our painting was going to be similar to a monochromatic colour scheme… but not quite. We wanted to take the main colour red and shift it towards purple and blue for the dark chess pieces. We also wanted to take the main red colour and shift it towards yellow for the white chess pieces. So… our colour scheme would be expanding to either side of the red just a little bit.
My dad has a rule about mixing colours,
“always use at least three different colours when mixing a colour
together!” So, to make our starting
color we mixed together a lot of red, a little bit of yellow, and just a few
drops of white. My dad said that because
the colours were going to shift towards dark purples and blues that we should
also add a few drops of black to our main colour. It didn’t take too long until our main colour
was mixed together. Now it was time to
start painting!
My dad has plans to work with me to create
fun paintings for the next many years.
He wants to teach me a new technique in every new painting. Last time my dad taught me how to paint in
the spaces so the paint would be solid and smooth. This time he wanted to teach me a new way to
paint. He calls it the ‘wiggly worm’
technique. This technique uses little
wiggles. It looks cool because how much
paint you put on the paint brush determines how dark or light the wiggle is and
all of these slight shifts in colour end up creating a cool texture.
I decided that I wanted to use the first
red colour to paint the Japanese symbol.
The first step was to fill the symbol with spread out wiggles. It looks really cool when you make each
wiggle unique by making them look different from each other. This step is completed when 1/3 of the space
you’re painting is filled with wiggles.
The second step was to fill in half of the remaining white with the
colour. The third step was to fill in the rest of the space. It didn’t take too long until the first part
of the painting was done. I think it
looks great!
Next, I decided to paint the chess
board! Before I painted it, I had to change
the colour of the paint. So, I took the
colour we used for the Japanese symbol and added a small amount of yellow and a
bit more white. Now, we could paint
using this new colour! I used the same
technique I used for the Japanese symbol.
After I finished the board, I realized my skills have improved. I was a bit faster and my wiggly worms were a
bit better.
My dad wanted to teach me how I can use
the wiggly worm technique in a cooler way when we painted the sky. We still filled in this area with wiggly
worms, but after every layer of wiggles, we would change the colour by adding a
little bit of yellow and a few drops of white.
The top right side has a higher concentration of darker colours, and the
bottom left side has a higher concentration of lighter colours. There were over nine different shades of red
and orange used in the sky! The Japanese
symbol and the chess board ended up being one solid colour with an interesting
texture and the sky showed how mixing dark and light paint colours creates a
cascading texture with all the colours blending together. My dad calls this ‘eye candy’!
After that, it was time to paint the chess
pieces. I did not do them in black and
white because I wanted all the colours to relate to the original red that I
started the painting with. So, for the
dark chess pieces, I added the darker colour on the colour wheel that is
closest to red… that’s purple and then blue.
I also added some black because I wanted these chess pieces to be very
dark. For the light chess pieces, I
continued adding a little bit of white and a little bit of yellow to make a
very light yellowy orange colour.
For the chess pieces, I used the same
technique that I did with the sky. For
the dark chess pieces, every time I finished a layer, I would add a lot of blue,
a bit of purple and a little bit of black.
For the light chess pieces, I would add a little bit of white, and a few
drops of yellow every time I finished a layer.
So, there are actually three different colours in each chess piece.
In any painting on a canvas, you always
have to paint the border. If you don’t,
you would have white all around the border and it wouldn’t look as nice. Instead of using wiggly worms, I painted
thick, fat lines that follow the edge of the canvas. My dad said that it is always best to add the
darker border colours to the bottom half of the canvas edge. He says that this ‘gives weight’ to the
bottom so that the canvas doesn’t look like it wants to fall off the wall.
The border colours were added as we
painted the main image. So, pretty much
every colour that is in the painting is also on the border. The hardest part about painting the border
was that I had to stand up to paint it.
I used my left hand to hold the canvas steady while I painted the edge
with the paint brush in my right hand.
It was a little tricky… but my dad said I did a great job!
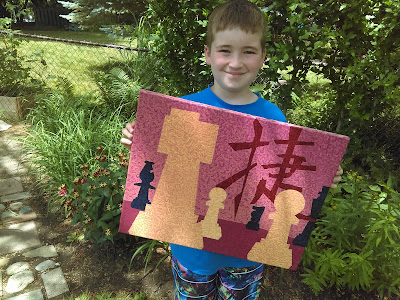
Yay, the painting is finished! Well, not quite. My dad says we have to put a varnish on
top. The varnish stops the ultra violet
(UV) rays from fading the colour. UV
rays come from the sun. We used a flat,
wide paintbrush to lay down the varnish and we did this four times to give the
painting lots of protection.


.png)
.png)
.png)

.png)


No comments:
Post a Comment